In this tutorial, I will show you how to set up a Proxy on Ubuntu, from the Settings app, and the CLI.
What You’ll Need
For this tutorial, you’ll need:
- An Ubuntu system. This tutorial was written for and tested on Ubuntu 22.04, but it will work on any other Ubuntu version or Ubuntu derivatives.
- A proxy. I’m using proxies by Bright Data, but you can use any other proxy service provider. You’ll need the username, password, IPs, ports, and protocols for the proxy you plan on setting up.
- Access to the Command-line Interface (CLI) or the Graphical User Interface (GUI), in this case, GNOME.
- A sudo/root user.
How to set up a Proxy on Ubuntu via the GUI
First, go to the Settings app. You can find it in the Activities menu, or just hit the “Windows” key, start typing “settings” and click on the Settings app.

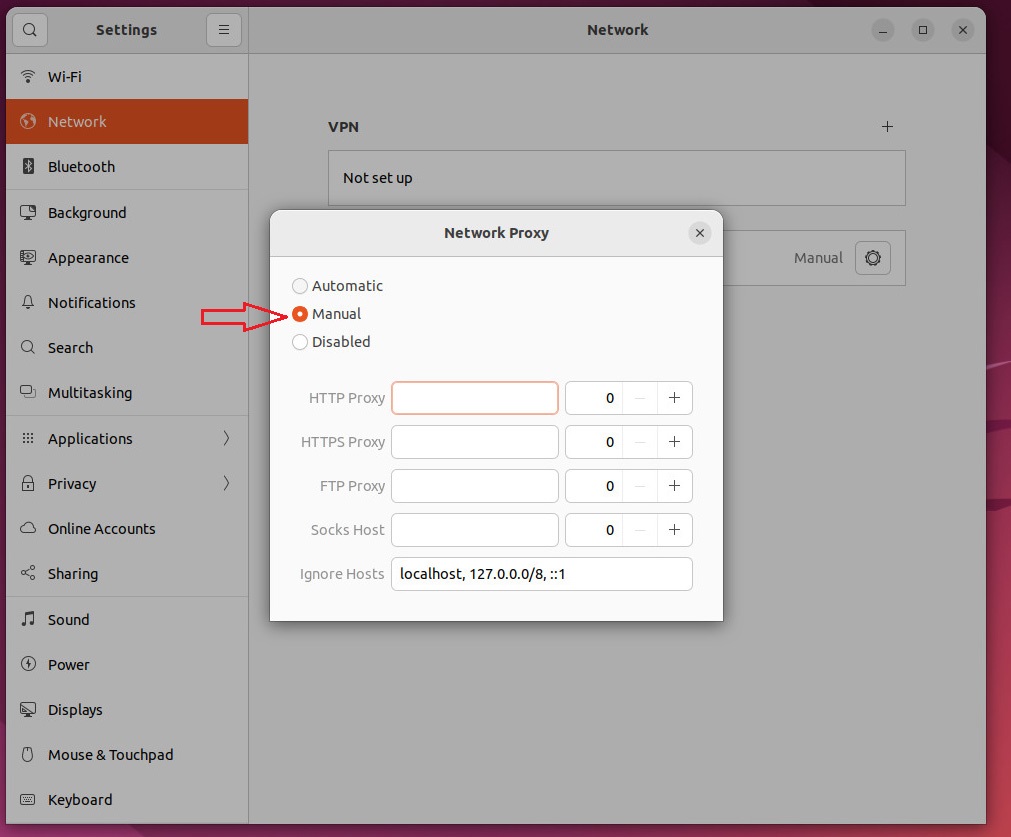
Once you open the Settings app, click on the Network tab on the left and click on the cog for Network Proxy.

A pop-up window will appear where you need to select “Manual” and enter your proxy data. Enter the IPs and ports and close all the windows. You can get the IPs/ports from your Proxy provider. You’ve now set up a Proxy on Ubuntu.
How to set up a Proxy on Ubuntu via the CLI
If you want to do this via the Terminal, follow the steps below. It will give you more options and more flexibility in setting up the proxy.
How to set up a system-wide permanent proxy for all users
To set up a system-wide proxy for all users, open up /etc/environment:
sudo nano /etc/environment
And add the lines from below to the file. Don’t forget to change them with your proxy domains/IPs/ports.
http_proxy="http://username:password@myproxy.server.com:8080/"
https_proxy="http://username:password@myproxy.server.com:8080/"
ftp_proxy="http://username:password@myproxy.server.com:8080/"
no_proxy="localhost,127.0.0.1,localaddress,.localdomain.com"
HTTP_PROXY="username:password@myproxy.server.com:8080/"
HTTPS_PROXY="username:password@myproxy.server.com:8080/"
FTP_PROXY="username:password@myproxy.server.com:8080/"
NO_PROXY="localhost,127.0.0.1,localaddress,.localdomain.com"
Some values are duplicated intentionally because certain programs only detect the uppercase variables and others only detect the lowercase variables. If you don’t need some of the proxies, you can delete the lines.
After adding the lines, save and close the file and reboot the system for the changes to take effect.
If you’re using apt (or software center), it won’t use these proxy settings. You’ll need to set them up separately.
How to set up proxy settings for aptitude (apt, apt-get)
First, you need to create a file in the /etc/apt directory:
nano /etc/apt/proxy.conf
And add the lines from below to the file. Make sure to update them with your proxy settings.
Acquire::http::proxy "http://username:password@myproxy.server.com:8080/";
Acquire::ftp::proxy "http://username:password@myproxy.server.com:8080/";
Acquire::https::proxy "http://username:password@myproxy.server.com:8080/";
How to set up a permanent proxy for one user
To set up a proxy for a single user, you need to edit the .bashrc file.
Open it up:
sudo nano ~/.bashrc
And add the lines from below at the end of the file. Make sure to update them.
export http_proxy=http://username:password@myproxy.server.com:8080/
export https_proxy=http://username:password@myproxy.server.com:8080/
export ftp_proxy=http://username:password@myproxy.server.com:8080/
export no_proxy=localhost,127.0.0.1,localaddress,.localdomain.com
export HTTP_PROXY=username:password@myproxy.server.com:8080/
export HTTPS_PROXY=username:password@myproxy.server.com:8080/
export FTP_PROXY=username:password@myproxy.server.com:8080/
export NO_PROXY=localhost,127.0.0.1,localaddress,.localdomain.com
Save and close the file. Then, run the following command to apply the changes:
source ~/.bashrc
How to set up a temporary proxy for a single user
This temporary proxy will only last until you reboot your system.
Run all of the commands below (or just the ones you need). Make sure to update them with your settings:
export http_proxy=http://username:password@myproxy.server.com:8080/
export https_proxy=http://username:password@myproxy.server.com:8080/
export ftp_proxy=http://username:password@myproxy.server.com:8080/
export no_proxy=localhost,127.0.0.1,localaddress,.localdomain.com
export HTTP_PROXY=username:password@myproxy.server.com:8080/
export HTTPS_PROXY=username:password@myproxy.server.com:8080/
export FTP_PROXY=username:password@myproxy.server.com:8080/
export NO_PROXY=localhost,127.0.0.1,localaddress,.localdomain.com
And that’s about it. I’ve shown you all options for setting up a Proxy on Ubuntu.
Don’t forget to update all the commands with your proxy data. Your proxy provider may give you a domain or an IP. They may give you a proxy that requires authentication (username and password) or a proxy that doesn’t require authentication. In any case, you’ll need to update the commands with your settings. They’ll likely be readily available from your provider.
More proxy options on Ubuntu
If you want more options for your proxy, like using a caching proxy, you can use Squid. If you need a non-caching proxy, you can use Privoxy. It gives you more options than the system proxy settings. If you need to learn more about settings up proxies on Linux, check the Arch Wiki.
Note: I haven’t used Firefox in a while, but I think Firefox won’t respect the system’s proxy settings, so you’ll need to set them up manually in Firefox Settings too. Chrome does respect the system’s proxy settings.
What’s the difference between a Proxy and a VPN
In a nutshell, a VPN encrypts and protects all data and traffic and it’s in most cases system-wide. Proxies can be set up for specific apps and services only. They don’t have to be system-wide. There are upsides and downsides to both. There are detailed instructions on how to set up a VPN on Ubuntu here and reasons why you’d need a VPN here.


